Thursday, December 12, 2013

BIG SALE on my Facebook page! Today only!

I'm clearing out my 2013 merchandise which translates to BIG savings for you!  Stop by my Facebook Page to see what's on sale!  Prices good for 24 hours only and include shipping!!! Stop on by!!


Photobucket

Tuesday, October 29, 2013

Easy Last-Minute Halloween Costume: Clark Kent

So it's two days before (or the morning of!) Halloween and your teen son decides he really ISN'T too old to go trick-or-treating again this year. What do you do?

Here is my solution for a quick and easy last-minute costume:

Presenting, Clark Kent


It's definitely not a bird nor a plane, but this Superman definitely turned the heads of some teen girls last week at our church's Trunk or Treat!


We had all the pieces at home, all I needed to buy was the superman logo tee shirt, which I picked up at my local Target.

Clark Kent wears:

  • Black high top chucks (Converse One-Stars from Target):$17 on clearance
  • White Dress Shirt (owned) Free
  • Tie (Owned--You can get a shirt/tie combo at Walmart for $10) Free
  • Dress Slacks (Owned--You can find dress slacks at Walmart for $10) Free
  • Black glasses (3D movie theater glasses) Free
  • Superman tee shirt (Target) $11 after Cartwheel discount
  • Good looks: Priceless!
My total cost:  $28 by reusing some items he already owned...technically only spent $11, since I had bought the Chucks a few weeks ago, but these were his first time wearing them, so I added it in.  ;)


Photobucket

Thursday, October 24, 2013

DIY Minion Halloween Costume {Ba ba ba ba-ba na-na!}

Today's costume is an easy DIY!  My daughter knew that she wanted to dress up like this character since we watched Despicable Me 2 this summer.

Presenting:

The DIY Minion


Just looking at this kid makes me want to say: BEE DOH!  BEE DOH!  BEE DOH!!

I love the way this all came out!  I used a mix of hand-me-downs, consignment and new items.  She will be wearing this on Halloween night!

This DIY Minion wears:

  • Black Chucks (Converse All Star hand me downs from her brother): Free(ish) retail at about $30
  • Yellow Tee Shirt (my son's old band tee): Free --these retail less than $10 new
  • Thick Round Glasses (Michael's): $1
  • Yellow Beanie (Amazon): $5
  • Black Gloves (from an old costume): Free --you can find black gloves for about $1
  • Yellow Soccer Socks (Ross): $3 (for two pair)
  • Denim Overalls (cosigment shop): $3
  • Yellow Buttons (Joann): $1
  • Silliness--Priceless!
My total cost:  $13 with lots of reusable pieces!!


Photobucket

Wednesday, October 23, 2013

Nerdy 50s Girl {Putting a Twist on a Store Bought Halloween Costume}

As you saw in yesterday's post, I can't be happy with a store bought costume as is. We always add a little twist.  Today I present to you:

Nerdy 50's Girl:


This is another one of those costumes I picked up on clearance at Target years ago. I was so surprised when my daughter chose this costume to wear for our church's Trunk or Treat this year. The whole nerdy look was her idea, and I have to say, she rocks it!


She even swiped some of the masking tape from my DIY furniture projects to "nerdy up" her glasses!

Nerdy 50s Girl wears:

  • Black Chucks (Converse All Star hand me downs from her brother) Free(ish) retail at about $30
  • Nerdy glasses (old 3D movie theater glasses) Free -- also used for Hipster Dorothy
  • White lace bike shorts (Target clearance) $4 -- also used for Hipster Dorothy
  • Tall white socks (Target clearance) $2 -- also used for Hipster Dorothy
  • 50s Girl costume (Target Clearance 2010) $3
  • Potential to be the next Kristen Wiig -- Priceless!
Total cost to me: $9 (unless you count the shoes that I bought for my son in 2009 for about $30, and the hour's worth of elbow grease it took me to make them look new again!)


Photobucket

Tuesday, October 22, 2013

Hipster Dorothy Costume {an ironic DIY}

We love us some Halloween here in La Casa de Aqua Seventy6!  So much so, that my daughter will be sporting not one but THREE costumes this year.  She does have three events to attend, after all! ;)

On the morning of Halloween, she will be attending her very last Storybook Parade at school.  When she was in Kindergarten she dressed as the Cowardly Lion, so she wanted to end her elementary school costume career as another character from The Wizard of Oz...with a slight twist.

Presenting: "Hipster Dorothy"


For years I stocked up on costumes when Target marked them down to 90% off.  I picked up this Dorothy costume in 2010 for about $3.  When we moved to VA the following summer, the box containing all of our costumes accidentally ended up in storage here in FL.  When we finally returned, I thought for sure that she would have outgrown all of the costumes, but she was just able to fit into a couple!

It's hard to get an almost 11-year-old into red glittered maryjanes, so we gave this costume a little bit of a ironic twist.


Hipster Dorothy wears:
  • Red Chucks (these are faux Converse I ordered through Amazon) $11 with shipping
  • Ironic glasses with no lens (old 3D movie theater glasses) Free
  • White lace bike shorts (Target clearance) $4
  • Tall white socks (Target clearance) $2
  • Basket (thrift) 50 cents
  • Puppy (Gift) Free
  • Hair ribbons (Joann) $1
  • Dorothy costume (Target clearance 2010) $3
  • Attitude (hereditary)  Priceless
Total cost: $21.50 AND the shoes, socks and bike shorts are reusable.  You will see the shorts and socks again in tomorrow's post!

Photobucket

Friday, October 18, 2013

DIY Lampshade Pendant Light

I've been admiring the lampshade and drum pendant lights at my local home stores for months, but wasn't thrilled at the idea of paying anywhere from $60-$200 for a light fixture. 

I decided that I would attempt to recreate my own version of a lampshade pendant, and I was able to do so for just $25!  (You may be able to do this for less if you already own a lampshade or scoop one up on sale.)

Here is how it turned out: 


All you need is a Mini Pendant Kit (I found mine at Home Depot for $14.97) and a lampshade with a harp fitter (the kind with the tiny hole instead of the big hole.)  I found mine at Ross for $9.99.

I loosened and removed the cord of the pendant kit from the base, and slipped the cord through the harp hole and then just reattached the cord to the base.  That's it! 


Hubby then wired the kit to the ceiling and voila!  Complete!!


I decided to do this project in a day, so I didn't go out searching for the most amazing lampshade. But, if I do find one I can't live without, I will just have to bribe Hubby to take down the fixture so I can switch it out.  Hmmm....I don't think that will be happening any time soon!

My dining room is still a work in progress, but isn't every room?  Have a great weekend, friends!


Photobucket

Monday, October 14, 2013

15 Minute Project: Tablecloth Curtains

I needed some curtains for my dining room (in progress) but I couldn't find any that I loved without giving up my first born child in return.  Then I came across two of these tablecloths:


15 minutes later I had this:


I love quick and easy projects almost as much as I love repurposing and upcycling.  This is my favorite curtain tutorial so far, especially because it is only has 4 steps.

  1. Find a great deal on 2 identical oblong fabric tablecloths (Target's Threshold brand comes in 84" length...the same as a basic curtain panel! Many tablecloth brands range up to 120" in length for the same price!)
  2. Fold over the end of each of the tablecloths and pin to create a pocket on each for the rod.  The amount your fold depends on the size of the curtain rod.  Keep in mind that the more you fold over, the shorter the curtains will be. Make sure you fold them identically so that the panels hang evenly!
  3. Stitch along the bottom of each fold.
  4. Hang your new curtain panels!
What I love most is that tablecloths are already hemmed along all four sides, so you only have to sew one straight line across each!


Identical curtain panels at Target cost $24.99 each!  These tablecloths were $18.99 each (regular price). I saved 20% using my Cartwheel app, AND I had a Target coupon for $5 off a home purchase, so I ended up spending around $25 for both.  Another plus is that tablecloths are anywhere from 6" - 20" wider than curtain panels, so I only needed two for this large window, where I would've normally needed 4 traditional panels.


If you keep your eyes peeled, you will catch a great deal on some tablecloths.  I've seen some as low as $6 recently! 

A variation of this tutorial for more narrow windows:

  • Use only one tablecloth.
  • Cut the tablecloth in half lengthwise.
  • Hem both newly cut sides
  • Follow steps 2-7 above.
  • Save EVEN MORE MONEY!

Photobucket

Monday, September 30, 2013

Thrift Store Corkboards Two Ways

My daughter needed a corkboard to hang above her new desk and I was lucky to come across two giant corkboards at my local thrift store last week.  They were both on sale, marked down to just $1.25! They needed a little TLC, for sure, so this is what I came up with:

I was lucky enough to find a piece of fabric in my stash that was just the right size to upholster the corkboard.  Using a staple gun, I stretched and attached the fabric to the back of the frame stapling the whole way around. 


 That's it!  It probably took me less than 15 minutes total to upholster it and hang it on the wall.


I had some left over chalkboard paint from a project I did at least 2 years ago.  I don't think I ever shared it with you, but you can see it here.  I took the corkboard outside and spray painted it with the chalkboard paint, letting it dry between coats.  Easy peasy!!  I added a typography Julia Child quote with chalk and hung it near my kitchen table:


I think it looks fab...except hubby keeps reading it as "People Who Eat People"...maybe I'm too subconsciously addicted to The Walking Dead!

Can you believe these two corkboards once looked like this?


(Disclaimer:  I fully realize that these are awful photos!  This is what happens when you are in a rush to document a project!)


Photobucket

Tuesday, September 24, 2013

Ten Minute Teen Wolf {DIY Halloween Costume}

Last Halloween, my then 12-year-old son couldn't decide whether or not he wanted to dress up for trick-or-treating.  The truth is, he WANTED to dress up, but wasn't sure if other kids his age would be, as well.

On the morning of Halloween he finally decided he wanted to dress up regardless of what the other kids were doing.  Of course, that left me little time to come up with one of my totally awesome DIY costumes. ;)  He suggested dressing as a werewolf and here is what I came up with:

I had found some fur at the fabric store earlier in the month and picked up a remnant since he had been leaning toward werewolf IF he decided to dress up.  I cut the fur into wrist-sized rectangles and sewed on a small piece of elastic to the bottom so he could easily slip his hand through.

We threw together a flannel shirt, some jeans, and I used two shades of brown eyeliner and lip liner to draw fur on his face and give him a wolf's nose and bushy eyebrows.  I added a lot of gel to spike his hair and voila:  Ten Minute Teen Wolf!


Here he his posing with his sister, the Mad Haute Mad Hatter (which is quickly becoming one of my most popular posts thanks to Pinterest!)

So what is he going to be this year?  I hope I don't find out on Halloween morning again!  ;)

Photobucket

Sunday, September 22, 2013

Easy {DIY} Vintage Sewing Cabinet Makeover

The months of August and September have been crazy busy for me!  I thought for sure that when the kids were back to school that I would have SO MUCH TIME to get all of my housework, work-work, volunteer-work, and DIY fun-work done that I would be literally searching for something to do...WRONG!

Housework has been on hold, work-work has picked up, and volunteer-work comes in almost daily. This means that DIY fun-work gets squeezed in at all hours of the night while everyone is in bed and I am desperately trying to catch up with my "Mom-only" guilty pleasure shows (Mistresses, Devious Maids, Real Housewives of Miami...)

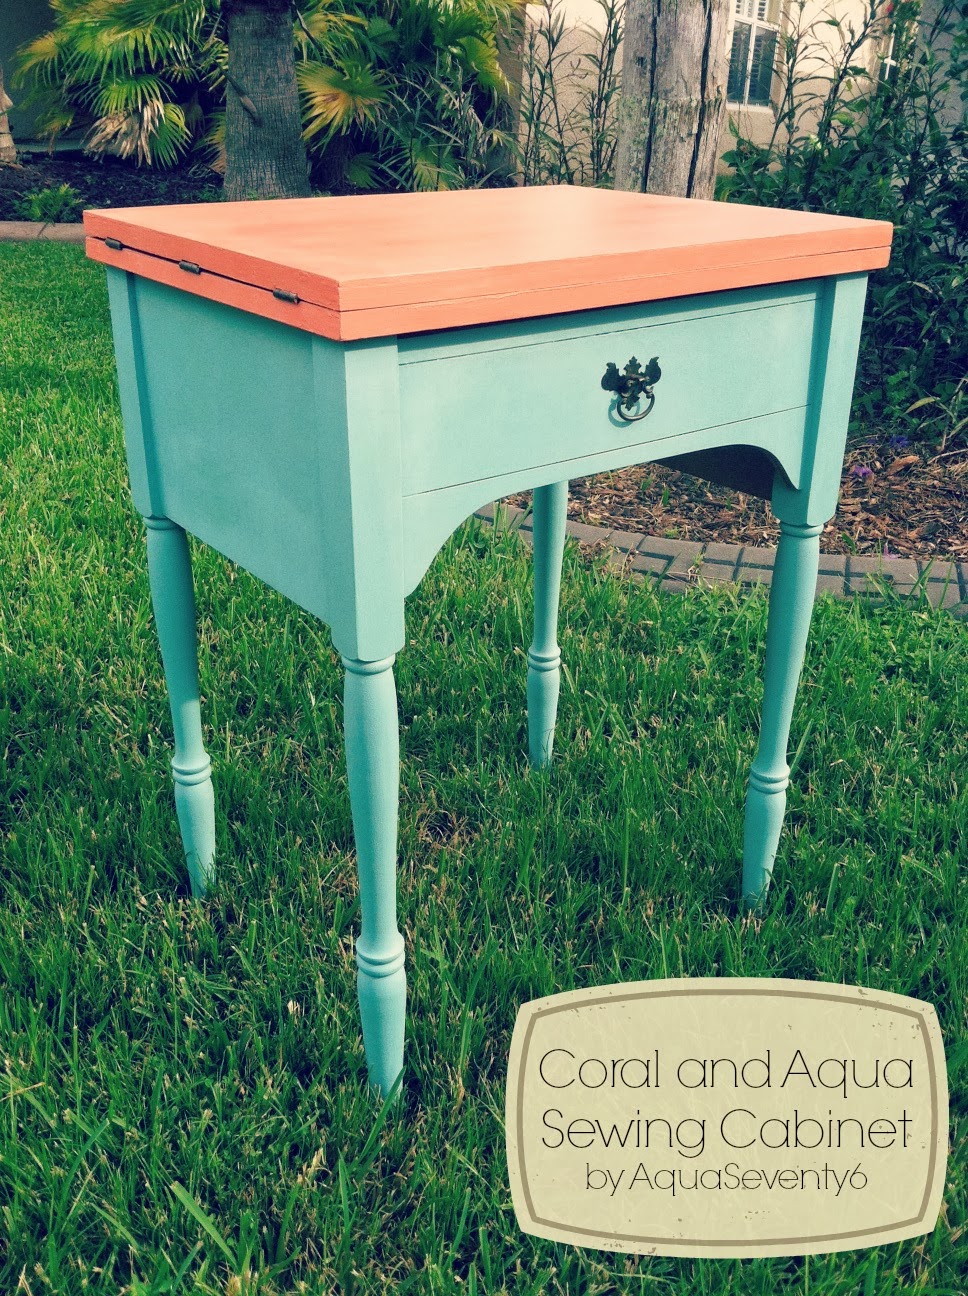
Here's my latest midnight project:

My Easy DIY Vintage Sewing Cabinet Makeover
My daughter has been asking for her own desk since school started, but she doesn't have a lot of space in her bedroom. As I was searching for a small table I could transform into a desk, I came across this vintage sewing cabinet at my local thrift.


These are a fairly common item at garage sales and thrift shops.  In fact, there were two different ones for sale on the day I found her.  Yep, it's a her....

She was marked at $35 because she came with a working sewing machine installed, still a pretty good deal, but I really just wanted the cabinet.  The tag showed that it was the 7th day since she had been put out for sale, so I asked the manager and he brought the price down to $20, machine and all.

This girl weighed a good 40 lbs, so even if I wanted to just tuck away the machine, I knew it would just be way too cumbersome to keep installed. I unscrewed the bolts and set the massively heavy machine aside for my upcoming charity yard sale.

As part of my search for a desk, I had come across a new (to me, at least) line of chalk paints at a local home goods consignment shop and I decided to try some out.

I fell in LOVE with this coral color called Gypsy by Vintage Market & Design Furniture Paint.  I coordinated it with some Annie Sloan Provence, used the Annie Sloan clear wax and left the hardware with its existing patina.  Not much work, but boy, what an update!

My daughter LOVES it, and it fits right into the little corner of her bedroom.  I'm still debating whether to hang a basket in the hole where the sewing machine was or to cover the hole completely with a thin piece of board, but for now she can do her homework in the comfort of her own room.


Adorable, right??  Now on to search for the perfect chair!

Photobucket


Click here to see the amazing sites where this and my other projects are linked!

 Other\ fun parties:
Saavy Southern Style